Windows Communication Foundation – Consuming a WCF service with ChannelFactory

This series of posts will talk about Windows Communication Foundation, starting with an introduction into the technology and how to use it in you project, moving onto more advanced topics such as using an IOC container to satisfy dependencies in your services.
Posts in this series:

In An Introduction to WCF I talked a little about what WCF is and how it can be used, as well as creating a simple WCF service. In this post I want talk about how to consume WCF services in the most common situations.

There are two common scenarios when consuming WCF services; consuming a WCF service from a non WCF client via a proxy, and consuming a WCF service from a WCF client via a shared contract with ChannelFactory.

Consuming a WCF service from a non WCF client via a service proxy

A service proxy acts as an interface between the client and the service. It means that the client does not need to know anything about the implementation of the service other than the operations that are exposed. A downside to using a proxy is that if the interface of the service changes then the proxy will need to be regenerated. Using a service proxy will be necessary if you do not control the service you wish to consume.

To add a service proxy you can either use svcutil.exe or let Visual Studio generate the proxies for you (which uses svcutil.exe underneath) by right clicking on a project and selecting Add Service Reference.

I don’t really want to dwell on service proxies too much, as there is lots of information available already and it is not really very interesting. There is another way to consume a WCF service if you have more control over the service and are using WCF services to provide some separation of concerns in your application.

Consuming a WCF service from a WCF client using ChannelFactory

A real world example is probably the easiest way to describe the type of situation in which this approach is useful. Lets say I am creating an ASP.Net MVC application and I want to have some separation in the layers. Along side the MVC client I want to have a repository to take care of the persistence side of things and a service layer to take care of the business logic so that I can call a service method in the Controller of the client that will perform some operation and maybe talk to the repositories.

It is of course possible to have the services in-process, and for a small application it may be a sensible solution. When moving to a larger application it may be prudent make the service layer true services that can be deployed on a separate server (or server farm) to aid scalability and security. WCF is a ideal technology for these services. In this instance the WCF services are only to be used by this particular application and so we can use some more WCF functionality to remove the need to keep generating service proxies. You will definitely appreciate this as you develop your application. Regenerating proxies gets a little tiresome after the hundredth time.

To use ChannelFactory it is necessary that both client and service host share the same operation and data contracts. Usually this means that the service interfaces (operation contracts) and data contracts are separated into separate assemblies so they can be shared between projects.

What is ChannelFactory anyway?

According to MSDN it is “A factory that creates channels of different types that are used by clients to send messages to variously configured service endpoints”. WCF uses a Channel Model layered communication stack to communicate between endpoints. As with other stacks such as TCP/IP the Channel stack provides an abstraction of the communication between the corresponding layer for the sending and receiving stack.

The stack provides an abstraction for how the message is delivered, the protocol to be used and other features such as reliability and security. Messages flow through the Channel stack and are transformed by a particular Channel, for example the transport channel transforms the message into the required communication format. Above that the protocol channels might encrypt the message or add headers. It is the ChannelFactory that is used to create the channel stack for a particular binding. For more information on the Channel Model see this MSDN article.

Using ChannelFactory to call a service

In the previous post I created a simple Product service with a single operation. I am going to extend that example to add an MVC client that uses ChannelFactory to consume the service. I will break the process into a number of steps to make it easy to follow.

1) Reorganise the solution to separate the interface and data contracts

I have moved the service interface and the data contracts into separate assemblies so they can be shared with the client. As mentioned briefly in the previous post, the data contracts would usually be Data Transfer Objects and not domain entities. For this example I have used domain entities an data contracts for ease. I have also added an Asp.Net MVC 4 project that will act as the client and consume the WCF service.

2) Add the WCF service model configuration to the client Web.config

Just as we added some configuration to the Web.config of the service project to let WCF know how we want the service to work, we also need to add some similar configuration to the client Web.config.

<system.serviceModel>
    <client>
        <endpoint 
            address="http://localhost:53313/ProductService.svc" 
            binding="wsHttpBinding" 
            contract="WcfServiceApplication.Contract.IProductService" 
            name="WSHttpBinding_IProductService"/>          
    </client>
</system.serviceModel>

We can once again see the ABC of WCF. The address is the URL of the service which I have set this to the URL of the Service when it is running0 from Visual Studio. When the client is deployed the address needs to be changed accordingly. The binding needs to be the same as the binding of the service you want to consume. The contract is the service contract from the shared assembly. Finally a name is used so ChannelFactory can get the configuration details by name.

3) Use ChannelFactory to call the service

As this is an MVC application, a service would generally be called from a controller. I have created a ProductController and a couple of views. The simple application works like this: a user enters a Product Id and selects to search. The product details are then displayed. The controller action that call the service looks like this:

public ActionResult View(int productId)
{
    var factory = new ChannelFactory<IProductService>("WSHttpBinding_IProductService");
    var wcfClientChannel = factory.CreateChannel();
    var result = wcfClientChannel.GetProductById(productId);

    var model = new ViewProductModel 
        { 
            Id = result.Id, 
            Name = result.Name, 
            Description = result.Description 
        };

    return View(model);
}

Firstly, create a new factory for the service contract required. The constructor takes the name of an endpoint from the configuration. A channel is then created based on the service contract and the named endpoint configuration. It is then possible to call an operation on the channel and return some results. I have then used the results in the model for the view.

Lets have a look at the MVC client application in action. I am not going to win any awards for design…

Lets search for a product:

And view the results:

Conclusion and next steps

As you can see from the above example, using ChannelFactory is a very easy way of calling a service when you have access to the service and data contracts. However if you were calling multiple services from a controller it would be better to get some reuse and not have to keep creating the factory and channel over and over again. It is possible to create a helper method to control the creation and use of factories but there is a better way.

You are probably already using Dependency Injection in your application via an Inversion of Control container such as Castle Windsor or Unity. It turns out that is it very easy to inject dependencies into service and also to inject a channel directly to where it is needed in your application. In the next post I will look at injecting dependencies into the service implementation.

Posts in this series:

Creating a NuGet Package from a TeamCity build

Posts in this series:

In a previous post I talked about how it was possible to set up .Net dependency management in TeamCity using NuGet. In this post I will cover the steps required to create a NuGet package as part of a TeamCity build, and publish it to TeamCity’s own NuGet package source server.

It is not uncommon to want to reuse a .Net project in another solution, maybe some common data access code. This would mean a bit of a maintenance headache when trying to keep things up to date and versioned correctly. NuGet and TeamCity have now made things very easy. Create a Nuget package for the project when it is built in TeamCity and publish it to TeamCity’s own Nuget package server. This package can then be picked up and used in any other project as a dependency like you would use an external package from the NuGet official package source.

Turn on TeamCity’s NuGet server

Since version 7, TeamCity has been able to host its own Nuget package feed. To enable it, head over to TeamCity’s Administration page and select NuGet Settings.

You will be presented with the URL’s for the NuGet feed. The feed URL will be added in Visual Studio and TeamCity as a package source to allow you to use the packages you create. If you want to turn on the public feed you will need to enable Guest login for TeamCity.

Create a package from a .csproj file

It is possible to create a NuGet package directly from a .csproj file in TeamCity. However if the project from which you wish to create the package has NuGet packages itself you will encounter a couple of errors after setting up a build step and attempting to run the build.

The first will probably be this one:

The imported project "C:\Program Files (x86)\TeamCity\buildAgent\work\c4ce4cf3674f70b0\ExampleProject\ExampleProject\.nuget\nuget.targets" was not found. Confirm that the path in the declaration is correct, and that the file exists on disk. C:\Program Files (x86)\TeamCity\buildAgent\work\c4ce4cf3674f70b0\ExampleProject\trunk\DataAccess\DataAccess.csproj

This problem is caused by some changes made by NuGet to the .csproj file resulting in TeamCity’s build agent not being able to resolve the path correctly.  A solution to this problem is outlined here. However once the fix has been applied you may well find that you encounter another error:

nuget pack: Specifying SolutionDir in properties gives Exception: An item with the same key has already been added.

This looks like it is a Nuget error. An issue has been raised here but at the  time of writing it has not been actioned. If anyone has a solution I would be very interested to hear it.

Don’t despair at this setback. Even if this approach worked correctly it is a bit of a blunt tool. Much better is to use a .nuspec manifest to describe the package we want to build.

Create a package from a .nuspec manifest

A .nuspec manifest is an XML document that defines the content of a NuGet package. A lot of effort has gone into the NuGet documentation on .nuspec files so I am not going to recreate all of it here. Instead I will just show you .nuspec file I used and talk about a few interesting parts. First of all, create a file next to the .csproj of the project you want to package. I want to package my DataAccess project so I created a file called DataAccess.nuspec.  Here is the content:

<?xml version="1.0"?>
<package xmlns="http://schemas.microsoft.com/packaging/2011/08/nuspec.xsd">
  <metadata>
    <version>0.00</version>
    <authors>James Heppinstall</authors>
    <owners>James Heppinstall</owners>
    <id>DataAccess</id>
    <title>DataAccess</title>
    <requireLicenseAcceptance>false</requireLicenseAcceptance>
    <description>Description</description>
    <copyright>Copyright James Heppinstall 2012</copyright>
    <dependencies>
        <dependency id="PetaPoco.Core" version="4.0.3" />
      </dependencies>
  </metadata>
  <files>
    <file src="ExampleProject\trunk\DataAccess\bin\Release\DataAccess.dll" target="lib\DataAccess.dll" />
  </files>
</package>

Most of it is straight forward and is covered in the NuGet documentation. It doesn’t matter what the version number you put in. It will be replaced by the build number from the TeamCity build. The dependencies section should contain a list of the NuGet packages for the project. If you are unsure which packages your project uses the best thing to do is to look in the project’s packages.config for the correct name and version.

The files section is where you list the files to be included. I have just included the single .dll as an example. You can also target specific framework versions in the same package using a convention. If I wanted to target only .Net4.0 I would have used

<file src="ExampleProject\trunk\DataAccess\bin\Release\DataAccess.dll" target="lib\net40\DataAccess.dll" />

Remember that a  NuGet package is not just limited to dependencies. It is possible to create a package that contains an entire project structure with code and configuration, including scripts to perform data transformations along the way. So you could create a template package for your organisation’s web site development.

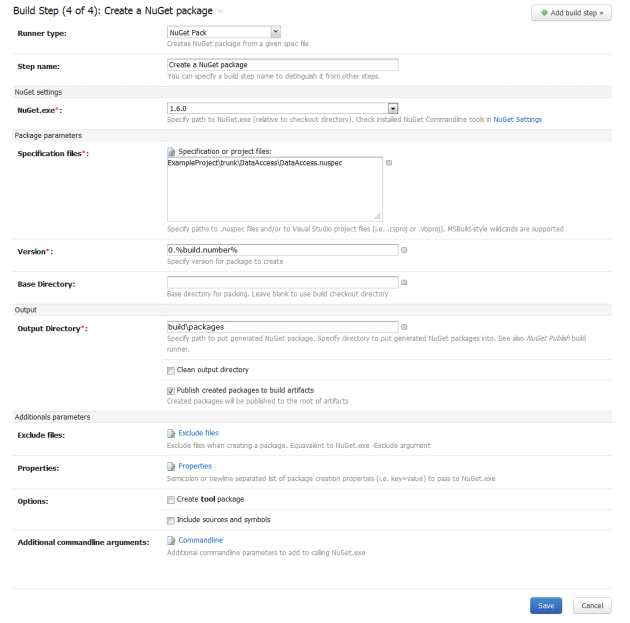
Now we have the .nuspec file the next step is to create a new build step for the TeamCity Project.

Simply select a Runner Type of NuGet Pack, add the path to your .nuspec file and you are good to go. I have selected to publish the package to the build artifacts. This can be useful for audit-ability.

Run the build and check that the Package is created in the build artifacts. If all is good the package is ready to be used in Visual Studio. From Tools | Library Package Manager | Package Manager Settings and select package sources. Add the TeamCity feed URL you wish to use, either authenticated or guest (I have added both for illustration purposes). Of course you should use the correct server name as you will probably not be running TeamCity on your development machine.

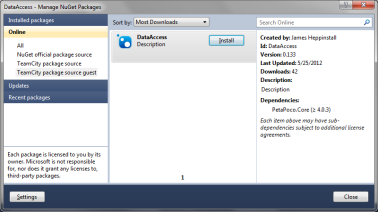
Now when you go to Manage Nuget Packages for a project you will be able to select the TeamCity package feed and see the Package you have just created, ready to be added to a new project.

And that’s all there is to it. NuGet and TeamCity make dependency management for your .Net code base very simple.

An Introduction to Windows Communication Foundation – Creating a basic service

This series of posts will talk about Windows Communication Foundation, starting with an introduction into the technology and how to use it in you project, moving onto more advanced topics such as using an IOC container to satisfy dependencies in your services.
Posts in this series:

Before the introduction of Windows Communication Foundation (WCF) in 2006 there were lots of different Microsoft technologies for building distributed systems. ASP.NET Web Services (ASMX), Web Service Enhancements (WSE) extensions, Microsoft Message Queue (MSMQ), the Enterprise Services/COM+ runtime environment and .NET Remoting to name the key ones. Microsoft were keen to point out that there was nothing wrong with these technologies, simply that there are too many of them. Building a distributed system required you to pick one of them as a fundemental technology which would send you down a specific technology strategy.

WCF is a single programming model that unifies all of the above approaches and more, and allows for a single technology choice to be used to support many different distributed systems scenarios.

Microsoft  describes WCF as

“a framework for building service-oriented applications. Using WCF, you can send data as asynchronous messages from one service endpoint to another. A service endpoint can be part of a continuously available service hosted by IIS, or it can be a service hosted in an application. An endpoint can be a client of a service that requests data from a service endpoint. The messages can be as simple as a single character or word sent as XML, or as complex as a stream of binary data.”

Don’t be put off by the reference to the often over hyped service orientation. WCF services can be used in many situations. It is often thought of as being too”enterprisy” for small applications. This is not the case at all. Services can be hosted in applications (Console, Winforms, WPF) as well as IIS and even a Windows Service. This opens up lots of possibilities for developing distributed applications. Many message formats are supported, including SOAP, plain XML and JSON. New formats are added as they gain traction within the industry.

If you have been reading about WCF you may have seen the ABC mnemonic when talking about endpoints;

  • A – Address: Where is the service?
  • B – Binding: How do I talk to the service?
  • C – Contract: What can the service do for me?
In WCF all communication occurs through an Endpoint. The ABC of WCF translates to some concrete steps that are followed when creating a WCF service:
  • You define a contract and implement it on a service – The language may be new but the concepts will be familiar. A WCF contract is an interface that defines service operations. The service implementation is simply an implementation of that interface.
  • You define a service binding that selects a transport along with quality of service, security and other options – This is usually done in configuration, but can be done in code if required.
  • You deploy an endpoint for the contract by binding it to a network address.  Configuration again. Tell WCF which contract interface should be associated with a particular endpoint.

Don’t worry if some of the terminology or concepts are new to you, we will cover these in more detail in the next section.

Creating you first WCF Service

Lets go ahead and create a new WCF Service Application project in Visual Studio, either in a new solution or an existing one, it doesn’t really matter for the purposes of this example. Be sure to target .Net3.5. There is a reason for this as .Net4.0 has lots of features to simplify configuration, but it is not that helpful to have lots of things defaulted behind the scenes when we are trying to understand how things work.

Visual Studio helpfully(?!) creates a service for us named Service1. A quick rename and we are done, right? Not quite. Although this service would work correctly, the way it has been created would not really be of any practical use in any but for the smallest of applications. The service implementation is in a code-behind on the .svc file and the interface is in the same file as the data contracts (the service model).

Lets just delete the files we don’t want and start again. Start with the code-behind file Service1.svs.cs and IService1.cs. Lets leave the Web.config for now as we can reuse the configuration already in there. If you were writing a full size application you may well want to structure your solution into several different projects for the different parts of the application. For this introduction I am going to use folders.

The first thing I am going to do is create a service contract. Remember that a service contract is just an Interface. Create a folder called Contract and an Interface within it, IProductService seems like a sensible name. Add a ServiceContract attribute to the interface. You will need a using statement for System.ServiceModel. Now we can add a service operation; called GetProductById(int productId). Each operation needs to have an OperationContract attribute. If this attribute is missing the operation will not be visible to WCF. The IProductService interface looks like this:

using System.ServiceModel;
using WcfServiceApplication.Domain;

namespace WcfServiceApplication.Contract
{
    [ServiceContract]
    public interface IProductService {

        [OperationContract]
        Product GetProductById(int productId);
    }
}

You will notice that the service operation returns a Product. I have defined this in the Domain folder. If an object is to be sent over the wire by WCF it needs to be attributed at the class level with DataContract and at the method level with DataMember (you will need to add a using statement for System.Runtime.Serialization) to indicate that the object can be serialised. I do not really want to get into the debate about returning Domain objects versus returning Data Transfer Objects from services at this stage as it doesn’t add much to the topic at hand. I will just say that for the purposes of this walk through I will use Domain objects, but for a non trivial application I would use DTO’s. The Product class looks like this:

using System.Runtime.Serialization;

namespace WcfServiceApplication.Domain
{
    [DataContract]
    public class Product
    {
        [DataMember]
        public int Id { getset; }

        [DataMember]
        public string Name { getset; }

        [DataMember]
        public string Description { getset; }
    }
}

Now we can implement the interface so the service can do something. I have given it a trivial implementation. In a real application the service would be responsible for doing something interesting such as performing some calculations or getting some data from somewhere.

using WcfServiceApplication.Contract;
using WcfServiceApplication.Domain;

namespace WcfServiceApplication.Implementation
{
    public class ProductService : IProductService
    {
        public Product GetProductById(int productId) {
            return new Product {
                                       Id = productId, 
                                       Name = "Product" + productId, 
                                       Description = "A nice product"
                               };
        }
    }
}

The next step is to tell the .svc file to use the new implementation we have created. Rename the file to productService.svc and edit the contents to point to the implementation.

<%@ ServiceHost Language="C#" Debug="true" 
    Service="WcfServiceApplication.Implementation.ProductService" %>

We only have the Web.config to go before we have a working service. Open Web.config and find the system.serviceModel section which contains the configuration for the WCF services.

In the system.serviceModel there are two further sections: services and behaviors.

Services – All services have their own section under services. There is just one right now which is incorrectly configured and we will fix things up as we go. The service has two attributes and one or more endoint elements:

  • name attribute – this should match the service attribute from the ProductService.svc, which is WcfServiceApplication.Implementation.ProductService.
  •  behaviorConfiguration attribute – this should match a service behaviour. We havent encountered one yet (its coming up in the behaviors section) so lets just change the value to WcfServiceApplication.ProductServiceBehavior in anticipation.
  • endpoints – As mentioned earlier, an endpoint is how a WCF service communicates with the outside world. A service can have one or more endpoints. Our example has two. Lets have a closer look at the first one.
    • address = “” – this is a relative address, which means that the address of this service will be relative to the base address. This is the most common address but can be different. It is also possible to add a base address if you want things to work differently. A good introduction can be found here.
    • binding=”wsHttpBinding” – a binding is used to define how to communicate with an endpoint. It has a protocol stack that determines things like security and reliability from messages sent to the endpoint. It describles the transport protocol to use when sending to the endpoint (HTTP, TCP etc). It also describes the encoding of the messages that are sent to the endpoint (text/xml etc). WCF has some binding to choose from that cover a variety of scenarios. We are using wsHttpBinding which offers good support for interoperation with other services that support the WS-* standards. Other bindings can be used depending on whether you need backwards compatibility with old asmx style services, or whether you want high performance when building WCF services that are also to be consumed by a WCF client for example. More information about bindings can be found here.
    • Contract – this should be changed to the location of the contract we created early, which is WcfServiceApplication.Contract.IProductService.

You may have noticed that this is the ABC of WCF I mentioned earlier. There is another endpoint with address=”mex”. This is to allow clients to be able to get the metadata for the service via SOAP calls. We can leave it in as we plan on using the metadata at a later stage. The services section now looks like this:

<services>
    <service name="WcfServiceApplication.Implementation.ProductService" behaviorConfiguration="WcfServiceApplication.ProductServiceBehavior">
      <endpoint address="" binding="wsHttpBinding" contract="WcfServiceApplication.Contract.IProductService">
        <identity>
          <dns value="localhost"/>
        </identity>
      </endpoint>
      <endpoint address="mex" binding="mexHttpBinding" contract="IMetadataExchange"/>
    </service>
  </services>

Behaviors – This section can have a number of behaviours which can be applied to a service. Remember that we changed the behaviorConfiguration value and we need to change the name of the behavior to be the same to enable our service to find it. The behavior has two elements:

  • serviceMetadata httpGetEnabled=”true” – this enables metadata exchange and also allows the WSDL to be access by a special URL (which is the service url with ?wsdl at the end). You don’t always need metadata exchange, but we will be using it later.
  • serviceDebug includeExceptionDetailInFaults=”false” – do we want to show useful debugging info? The default is false and will keep it that way. This may be useful if you are debugging a service but should not be used in a production environement.

The behavior section now looks like this:

 <behaviors>
      <serviceBehaviors>
        <behavior name="WcfServiceApplication.ProductServiceBehavior">
          <serviceMetadata httpGetEnabled="true"/>
          <serviceDebug includeExceptionDetailInFaults="false"/>
        </behavior>
      </serviceBehaviors>
    </behaviors>

Thats it. We are ready to run the service for the first time. The easiest way is using the WCF Test Client. highlight ProductService.svc in SolutionExplorer and hit F5. All being well WCF Test Client should load with the service visble. If you get any errors when you load the service it is very likely that there is a typo somewhere in either the files or the web.config.

Under the service you should be able to see the service along with the single service operation GetProductById(). Select the method to bring up the request and response panels for the method. You should be able to add a product Id (any number will do) and hit invoke to see the outcome.

That’s all there is to it. Of course there are a lot more configuration possibilities for more advanced scenarios, and we will cover some in future posts. In the next post I will cover how to create a client application to consume the WCF service we just created.

Posts in this series:

Dynamic Method Invocation in C# with PetaPoco (Part 2)

In Part 1 I looked at how PetaPoco used Dynamic Method Invocation to return a method that could convert an IDataReader column into a  Dynamic ExpandoObject. Now its time to look at the the other functionality used to return scalars and POCOs.

Scalars

In PetaPoco a scalar value is returned in the following way:

string column = db.ExecuteScalar<string>("SELECT Column FROM Table");

The functionality to create a factory to get the scalar values is part of the same GetFactory method covered in the previous post. I will pick up the method body when we already have the IlGenerator. After a check to see if the required type is a value type, a string or a Byte[] (indicating a scalar value) the method body is built up with IL. As before there is logic to perform some conversion for particular IDataReader implementations, and once again I am going to ignore it for the sake of brevity.

il.Emit(OpCodes.Ldarg_0);		// rdr
il.Emit(OpCodes.Ldc_I4_0);		// rdr,0
il.Emit(OpCodes.Callvirt, fnIsDBNull);	// bool

The first operations are the start of the if-statement to see if the value is null or not. First the IDataReader is pushed onto the stack then Ldc_I4_0 pushes on an int 0. As ExecuteScalar always returns the first column of the first row, this 0 represents column(0).  The Callvirt calls a previously defined MethodInfo for IDataRow.IsDBNull(). These three statements are the equivalent of r.IsDbNull(0). The result of this method call will be left on the top of the stack.

var lblCont = il.DefineLabel();
il.Emit(OpCodes.Brfalse_S, lblCont);
il.Emit(OpCodes.Ldnull);		// null

If the value on the top of the stack is false (indicating that the value returned from the IDataReader is not null the execution is branched to a label further in the execution. If it is true then null is pushed onto the top of the stack.

var lblFin = il.DefineLabel();
il.Emit(OpCodes.Br_S, lblFin);
il.MarkLabel(lblCont);
il.Emit(OpCodes.Ldarg_0);		// rdr
il.Emit(OpCodes.Ldc_I4_0);		// rdr,0
il.Emit(OpCodes.Callvirt, fnGetValue);	// value

After the null has been pushed to the stack a Br_S jumps to the lblFin label, which we will see in a moment. We can now pick up the execution from the lblCont label. Recall that we would branch to this point if the value is not null. Once again the IDataReader is pushed to the stack, followed by 0. We have encountered fnGetValue previously. It is a MethodInfo for IDataRecord.GetValue(i). It will be called on the IDataReader with the paramerter 0. This will leave the value on the top of the stack.

il.MarkLabel(lblFin);
il.Emit(OpCodes.Unbox_Any, type);       // value converted

Finally Unbox_Any is called on the value. This converts the object value to the unboxed type specified. It has the effect of casting the value from the IDataReader to the specified type. If the incorrect type had been specified in the ExecuteScalar method an InvalidCastExcpetion would be called at this point.

As before the value would be returned by il.Emit(OpCodes.Ret).

POCOs

Now its time for the main event, as POCO support is how PetaPoco came to have its name and is one of the key differentiators from similar micro ORMs.  Lets jump straight in.  We have already encountered many of the op codes and MethodInfo’s so we can pick up the pace a little.

// var poco=new T()
il.Emit(OpCodes.Newobj, type.GetConstructor(BindingFlags.Instance 
    | BindingFlags.Public | BindingFlags.NonPublic, nullnew Type[0], null));

// Enumerate all fields generating a set assignment for the column
for (int i = firstColumn; i < firstColumn + countColumns; i++)
{

The first thing is to push an instance of the the POCO type onto the stack with Newobj. Then its time to loop through the columns.

 // Get the PocoColumn for this db column, ignore if not known
 PocoColumn pc; if (!Columns.TryGetValue(r.GetName(i), out pc)) 
 continue;

PetaPoco is only interested in return columns from the IDataReader that are actually part of the POCO. Columns is a Dictionary holding the POCO property information. If there is not an entry in Columns for the current IDataReader column move onto the next.

 // Get the source type for this column
 var srcType = r.GetFieldType(i);
 var dstType = pc.PropertyInfo.PropertyType;

Next, get the source and destination types for the column.

il.Emit(OpCodes.Ldarg_0);		 // poco,rdr
il.Emit(OpCodes.Ldc_I4, i);		 // poco,rdr,i
il.Emit(OpCodes.Callvirt, fnIsDBNull);	 // poco,bool
var lblNext = il.DefineLabel();
il.Emit(OpCodes.Brtrue_S, lblNext);	 // poco

We have seen something very similar to this before, used to check if the IDataReader column is of type DBNull. If it is we branch to lblNext, which is directly before the end of the loop. This means that if the value is null in the database, no mapping to the POCO will take place.

il.Emit(OpCodes.Dup);			// poco,poco

var valuegetter = typeof(IDataRecord)
            .GetMethod("Get" + srcType.Name, new Type[] { typeof(int) });

Get a MethodInfo to call the required GetType method on the IDataReader.

if (valuegetter != null
    && valuegetter.ReturnType == srcType
    && (valuegetter.ReturnType == dstType 
        || valuegetter.ReturnType == Nullable.GetUnderlyingType(dstType)))
		{

Check if the return type from the valuegetter method is the same as the source type from the IDataReader, and that the return type is also the same as the underlying type. Nullable.GetUnderlyingType is used for the case where dstType is a Nullable type.

Once we have asserted that the mapping can take place we can start to build up the IL.

il.Emit(OpCodes.Ldarg_0);		// poco,poco,rdr
il.Emit(OpCodes.Ldc_I4, i);		// poco,poco,rdr,i
il.Emit(OpCodes.Callvirt, valuegetter);	// poco,poco,value

Get the value from the IDataReader using the MethodInfo defined above and put it on the top of the stack.

// Convert to Nullable
if (Nullable.GetUnderlyingType(dstType) != null)
{
    il.Emit(OpCodes.Newobj, 
    dstType.GetConstructor(new Type[] { Nullable.GetUnderlyingType(dstType) }));
}

If the destination type (the POCO column) is a Nullable type, then convert the value from the IDataReader to the nullable version of the type. The code within the if-statement is equivalent to T? x = new T?(value). The stack is now poco, poco, value.

il.Emit(OpCodes.Callvirt, pc.PropertyInfo.GetSetMethod(true));	// poco
il.MarkLabel(lblNext);
}

Finally, the property setter for the poco property is called with the value. The poco with the assigned value is left on the stack and the process is repeated with the next column.

When all the columns has been processed there is one final thing to do before we return the POCO.

var fnOnLoaded = RecurseInheritedTypes<MethodInfo>(type, 
        (x) => x.GetMethod("OnLoaded"BindingFlags.Instance | BindingFlags.Public 
            | BindingFlags.NonPublic, nullnew Type[0], null));

if (fnOnLoaded != null)
{
    il.Emit(OpCodes.Dup);
    il.Emit(OpCodes.Callvirt, fnOnLoaded);
}

Look for an OnLoaded method somwewhere in the POCO type inheritance hierarchy. If the method is present then call it on the POCO to signify that the POCO has been loaded.

il.Emit(OpCodes.Ret);

Finally return the POCO complete with the values from the IDataReader.

I would definately suggest having a look at the PetaPoco source. There are lots of interesting techniques to discover.

Dependency Management in .Net with NuGet and TeamCity

Posts in this series:

Dependency management for .NET has traditionally been via dependencies being stored in a ‘Lib’ folder, or something similar, which is then checked into source control as part of the Solution. This means that the complete Solution can be pulled from source control and built with all the dependencies in place. Whilst this is seen as best practice by many .NET developers it is not without its issues, not least a rapid growth in repository size when a project has many dependencies. In most .Net shops it is done without question, as just the way it is done. But there is another way…

Developers familiar with Java will no doubt be aware of the dependency management options available with tools as Maven (which provides much more besides just dependency management), but as yet .Net has resisted this kind of dependency-less source control approach.

New additions to the NuGet package management tool now move .NET towards true dependency management, and when coupled with JetBrains’ popular Continuous Integration (CI) server TeamCity dependency-less check in can become a reality for .Net development teams.

NuGet

What is it?

NuGet is an open source package management tool for the .Net platform. The project is currently lead by Phil Haack (formally of Microsoft and now GitHub) and has several prominent Microsoft contributors. Originally a Visual Studio Extension to easily incorporate dependencies into projects; it has evolved several features to support dependency management. A lot of the pressure to move in this direction has come from the community, and it is likely to evolve further still.

What is a package?

A package can contain many different items wrapped in a .nupkg zip. A simple library may just contain a .dll to add to the project references, but it is also possible to have a package that contains an entire project, for example a website template. This could include libraries, source code, pre-processing (such as updating namespaces and project names), merging items into web or application configuration, and even PowerShell scripts to perform actions.

Installing and using NuGet

In Visual Studio 2010 navigate to Tools | Extension Manager. Search the Online Gallery for NuGet and install. You must run Visual Studio with full privileges to do this.T he Tools menu should now contain section ‘Library Package Manager’ with some options for working with NuGet.

NuGet Options

To install and use a package, there are a couple of different ways:

  • ‘Manage NuGet Packages’ Dialog – Simply right click a project in the Solution Explorer, select ‘Manage NuGet Packages…’and search for the required package and select to install.

NuGet Packages Dialog

  • Package Manager Console – For those more inclined to the command line you can use the Package Manger Console to install a package using the Install-Package command with a package Id. The console can be accessed from the ‘Library Package Manager’  menu mentioned above. Remember to select the Package Source and the project to install the package in. It is also possible to install a specific version of the package by adding the version number after the Id.

Package Manager Console

A package contains everything needed to install and use the selected library or tool. If the library selected has further dependencies they too will be downloaded and installed if they are not already present. Nuget will take care to get the correct versions of any dependencies that are required. So in the example above we can see that Unity also has a dependency on CommonServiceLocator, which is downloaded by NuGet.

As part of the installation required files are copied to the solutions ‘Packages’ folder. If it does not exist it will be created for you. Also, any references will be added along with any required changes to configuration files.

A package can be removed from a project using either of the two methods above (except using the Uninstall-Package command in the console). All changes made by Nuget are reversed when a package is uninstalled.

Package Source

Packages live in a repository called a Package Source. The default package source is the NuGet Official Package Source. At the time of writing it contains nearly 6000 packages available for download.

A public package source may not be suitable for all NuGet users and it is possible to use a private repository. This could be something simple like a folder on a file share within an organisation, or a feed hosted in a web environment.

Setting the repositories to be used by NuGet can be done from Tools | Library Package Manager | Package Manager Settings. Simply add any package sources required and arrange the order of preference to indicate where NuGet should look first.

Package Source Selection

Publish a package

A package can contain many different items wrapped in a .nupkg zip. A simple library may just contain a .dll to add to the project references, but it is also possible to build a package that contains an entire project, for example a website template. This could include libraries, source code, pre-processing (such as updating namespaces and project names), merging items into web or application configuration, and even PowerShell scripts to perform actions.

A package can be added to a source by Publishing. To publish to a public source (such as NuGet.org) a user must register and receive their API key to use during publishing. To publish to a file location, just copy the .nupkg file to that location.

Of course, if you like to go retro, there are comprehensive command line tools for the creation and publishing of packages. However the easiest way to create and publish is via the NuGet Package Explorer. This little utility allows you to:

  • Download packages from a source (handy if you want to copy a package to a local repository)
  • View the metadata and contents of a package
  • Create a new package
  • Publish a package to a repository

 Enabling Package Restore

In the early days of NuGet the common workflow for source control of the NuGet Packages was simply to add the Packages folder to source control. Due to popular demand additional functionality has been added to NuGet to support dependency less check in.

Package restore will automatically pull and install any missing packages when the project is built. To turn on Package restore simply right click on the Solution in Visual Studio 2010 Solution Explorer and select ‘Enable NuGet Package Restore’.

A .nuget folder will be added to Solution root which contains the items needed to enable package restore to function.

Next we will look at how Package Restore is used with TeamCity to allow dependency less source control for your .NET Solution in a CI environment.

TeamCity With NuGet

Once we have enabled  Package Restore for a Solution in source control we can add build configuration in TeamCity for the project. This guide is not intended to be an introduction to TeamCity, and as such will mostly gloss over the other build configuration settings not directly related to using NuGet packages.

Build steps to restore packages

After configuring the general settings and version control settings the first build step should be to restore the dependencies from a Nuget Package source.

TeamCity has done a  great job of making the configuration really easy. Specify the build runner as NuGet package installer, select the version of NuGet and specify the path to the solution file and you are ready to go. It is possible to supply package sources if you want to use any other than the default source on-line, for example if you want to use a separate repository for your organisation.

That’s about all there is to it. The dependencies specified in your solution will be populated at build time. Its time to say goodbye to your lib folder.

Why not take a look at how you can use TeamCity to create a NuGet Package from a project and publish it to it’s own NuGet Package feed?

Test Driven Development with ASP.Net MVC (Part 2)

The series in full:

In Part 1, I talked about my view on TDD, and the particular flavour I use when doing TDD with MVC. In this post I am going to have a look at the feature we want to implement.

An event booking system

The functionality we are building is for an event booking system.  There is a database full of events, and people can use the web site to search for events and make a booking.

We are interested in implementing the search functionality. We may be fortunate to have analysts, testers and developers working together to craft the user stories with the product owner, but at this stage it doesn’t really matter how the user stories were created.  What matters is that there is a framework of ideas to build from.  They don’t have to be perfect, but it is difficult for the system to emerge without something to kick-start the ideas.

We have the following user story:

As a potential event attendee, I want to search for events, so that I can see all the available events that match my criteria

We also have some screen mock-ups to guide us.  A couple of the more relevant ones are shown below:

Event Search Screen mock-up 1

Event Search Screen mock-up 1

Event Search Screen mock-up 2

Event Search Screen mock-up 1

From the mock-ups, what behaviour do we want to cover? There are lots of potential scenarios, but lets focus on a few of the more straight forward ones for now:

• Search criteria options are pre populated
• Search for an event by region
• Search for an event by name
• No results returned from search
• Search criteria is ‘remembered’ when the results are shown

You will see that some of the scenarios overlap. For example, having no search results returned could well be part of searching for an event by name or region, however I find it better to cover the scenarios explicitly for the benefit of test separation in the case of both unit and acceptance testing.

From the scenario list we can now flesh out some examples to use:

Scenario 1 – Search criteria options are pre populated
GIVEN that I want to search for an event by region
WHEN I select to choose a region
THEN a list of possible regions is presented

Scenario 2 – Search for an event by region
GIVEN the following events exist

Event Code Event Name Region Description
CR/0001 Crochet for Beginners North A gentle introduction into the art of crochet
CR/0002 Intermediate Crochet North Taking your crochet to the next level
CH/3001 Cat Herding London A starter session for the uninitiated

WHEN I search for events in the “North” Region
THEN the search results present the following events

Event Code Event Name Region Description
CR/0001 Crochet for Beginners North A gentle introduction into the art of crochet
CR/0002 Intermediate Crochet North Taking your crochet to the next level

Scenario 3 – Search for an event by Name
GIVEN the following events exist

Event Code Event Name Region Description
CR/0001 Crochet for Beginners North A gentle introduction into the art of crochet
CR/0002 Intermediate Crochet North Taking your crochet to the next level
CH/3001 Cat Herding London A starter session for the uninitiated

WHEN I search for events with the name “Cat Herding”
THEN the search results present the following events

Event Code Event Name Region Description
CH/3001 Cat Herding London A starter session for the uninitiated

Scenario 4 – No Search results return from search
GIVEN the following events exist

Event Code Event Name Region Description
CR/0001 Crochet for Beginners North A gentle introduction into the art of crochet
CR/0002 Intermediate Crochet North Taking your crochet to the next level
CH/3001 Cat Herding London A starter session for the uninitiated

WHEN I search for events in the “South” Region
THEN I am informed that no search results have been returned

Scenario 5 – Search criteria is ‘remembered’ when the results are shown
GIVEN I have performed a search in the "North" region
WHEN the search results page is displayed
THEN the search criteria displays my choice of region

In Part 3 we will start implementing the application, guided by the behaviour defined in the scenarios.

The series in full: