Dependency Management in .Net with NuGet and TeamCity
May 15, 2012 6 Comments
Posts in this series:
- Dependency Management in .Net with NuGet and TeamCity
- Creating a NuGet Package from a TeamCity build
Dependency management for .NET has traditionally been via dependencies being stored in a ‘Lib’ folder, or something similar, which is then checked into source control as part of the Solution. This means that the complete Solution can be pulled from source control and built with all the dependencies in place. Whilst this is seen as best practice by many .NET developers it is not without its issues, not least a rapid growth in repository size when a project has many dependencies. In most .Net shops it is done without question, as just the way it is done. But there is another way…
Developers familiar with Java will no doubt be aware of the dependency management options available with tools as Maven (which provides much more besides just dependency management), but as yet .Net has resisted this kind of dependency-less source control approach.
New additions to the NuGet package management tool now move .NET towards true dependency management, and when coupled with JetBrains’ popular Continuous Integration (CI) server TeamCity dependency-less check in can become a reality for .Net development teams.
NuGet
What is it?
NuGet is an open source package management tool for the .Net platform. The project is currently lead by Phil Haack (formally of Microsoft and now GitHub) and has several prominent Microsoft contributors. Originally a Visual Studio Extension to easily incorporate dependencies into projects; it has evolved several features to support dependency management. A lot of the pressure to move in this direction has come from the community, and it is likely to evolve further still.
What is a package?
A package can contain many different items wrapped in a .nupkg zip. A simple library may just contain a .dll to add to the project references, but it is also possible to have a package that contains an entire project, for example a website template. This could include libraries, source code, pre-processing (such as updating namespaces and project names), merging items into web or application configuration, and even PowerShell scripts to perform actions.
Installing and using NuGet
In Visual Studio 2010 navigate to Tools | Extension Manager. Search the Online Gallery for NuGet and install. You must run Visual Studio with full privileges to do this.T he Tools menu should now contain section ‘Library Package Manager’ with some options for working with NuGet.
To install and use a package, there are a couple of different ways:
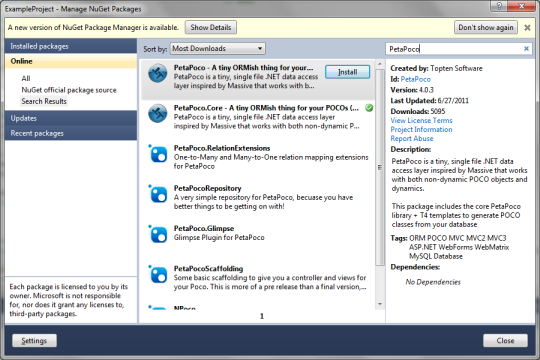
- ‘Manage NuGet Packages’ Dialog – Simply right click a project in the Solution Explorer, select ‘Manage NuGet Packages…’and search for the required package and select to install.
- Package Manager Console – For those more inclined to the command line you can use the Package Manger Console to install a package using the Install-Package command with a package Id. The console can be accessed from the ‘Library Package Manager’ menu mentioned above. Remember to select the Package Source and the project to install the package in. It is also possible to install a specific version of the package by adding the version number after the Id.
A package contains everything needed to install and use the selected library or tool. If the library selected has further dependencies they too will be downloaded and installed if they are not already present. Nuget will take care to get the correct versions of any dependencies that are required. So in the example above we can see that Unity also has a dependency on CommonServiceLocator, which is downloaded by NuGet.
As part of the installation required files are copied to the solutions ‘Packages’ folder. If it does not exist it will be created for you. Also, any references will be added along with any required changes to configuration files.
A package can be removed from a project using either of the two methods above (except using the Uninstall-Package command in the console). All changes made by Nuget are reversed when a package is uninstalled.
Package Source
Packages live in a repository called a Package Source. The default package source is the ‘NuGet Official Package Source‘. At the time of writing it contains nearly 6000 packages available for download.
A public package source may not be suitable for all NuGet users and it is possible to use a private repository. This could be something simple like a folder on a file share within an organisation, or a feed hosted in a web environment.
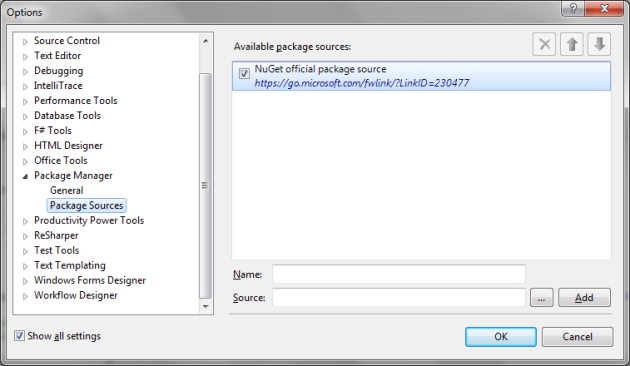
Setting the repositories to be used by NuGet can be done from Tools | Library Package Manager | Package Manager Settings. Simply add any package sources required and arrange the order of preference to indicate where NuGet should look first.
Publish a package
A package can contain many different items wrapped in a .nupkg zip. A simple library may just contain a .dll to add to the project references, but it is also possible to build a package that contains an entire project, for example a website template. This could include libraries, source code, pre-processing (such as updating namespaces and project names), merging items into web or application configuration, and even PowerShell scripts to perform actions.
A package can be added to a source by Publishing. To publish to a public source (such as NuGet.org) a user must register and receive their API key to use during publishing. To publish to a file location, just copy the .nupkg file to that location.
Of course, if you like to go retro, there are comprehensive command line tools for the creation and publishing of packages. However the easiest way to create and publish is via the NuGet Package Explorer. This little utility allows you to:
- Download packages from a source (handy if you want to copy a package to a local repository)
- View the metadata and contents of a package
- Create a new package
- Publish a package to a repository
Enabling Package Restore
In the early days of NuGet the common workflow for source control of the NuGet Packages was simply to add the Packages folder to source control. Due to popular demand additional functionality has been added to NuGet to support dependency less check in.
Package restore will automatically pull and install any missing packages when the project is built. To turn on Package restore simply right click on the Solution in Visual Studio 2010 Solution Explorer and select ‘Enable NuGet Package Restore’.
A .nuget folder will be added to Solution root which contains the items needed to enable package restore to function.
Next we will look at how Package Restore is used with TeamCity to allow dependency less source control for your .NET Solution in a CI environment.
TeamCity With NuGet
Once we have enabled Package Restore for a Solution in source control we can add build configuration in TeamCity for the project. This guide is not intended to be an introduction to TeamCity, and as such will mostly gloss over the other build configuration settings not directly related to using NuGet packages.
Build steps to restore packages
After configuring the general settings and version control settings the first build step should be to restore the dependencies from a Nuget Package source.
TeamCity has done a great job of making the configuration really easy. Specify the build runner as NuGet package installer, select the version of NuGet and specify the path to the solution file and you are ready to go. It is possible to supply package sources if you want to use any other than the default source on-line, for example if you want to use a separate repository for your organisation.
That’s about all there is to it. The dependencies specified in your solution will be populated at build time. Its time to say goodbye to your lib folder.
Why not take a look at how you can use TeamCity to create a NuGet Package from a project and publish it to it’s own NuGet Package feed?


Pingback: Creating a NuGet Package from a TeamCity build « James Heppinstall: On Development
Pingback: Confluence: Web Group
This is a quality blog post, well done. If you get 2 mins, can you say whether the .nuget folder that is added to the project folder needs to be checked-in to source control? (NuGet.exe et al) thanks!
Luke, I am checking my .nuget folder in. That way it holds the solution level packages. Plus, there was a package restore fix from @ferventcoder that requires a hard edit of that target — you’d definitely want that sourced.
Luke, as Kurt has already stated, the .nuget packages should be checked into source control. A small price to pay to keep your check-ins dependency free.
Pingback: TeamCity deployment pipeline (part 2: TeamCity 8, Build once and UI tests) | blog.mdavies.net